Examples of Stain Removal
In this section we're giving examples of some common stains and how to remove them. You can follow the setp-by-step examples and can find all the chemicals we use, as they are all from the list of reagents you'll find here.
You should be able to find help on any stain - on any fabric - below:
In this section we're giving examples of some common stains and how to remove them. You can follow the setp-by-step examples and can find all the chemicals we use, as they are all from the list of reagents you'll find here.
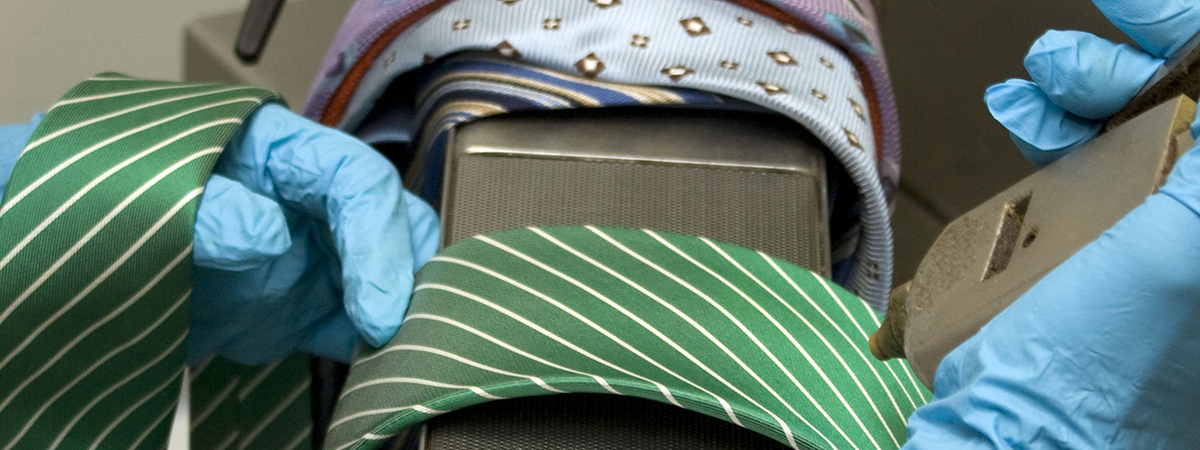
Biro ink doesn't normally come out in the wash, but it can spread to other garments, so try to check clothes before they go in the wash and always treat prior to laundering. The treatment below should remove the stain successfully, however if you would prefer a professionally formulated solution click on the stain treatment picture on the right.
We have created this stain on a t-shirt by drawing on it using a black biro. Get yourself ready to remove the stain by erecting your ironing board and covering the end with a plastic bag. This gives you a stable base to work from.


We use methylated spirits on a biro stain and apply it using a dropper. Take liquid directly from the bottle and apply one to three drops directly to the stain.
With the side of a spatula or the wrong end of a spoon work the spirit into the stain directly along the line of the ink. Rub gently as any hard rubbing action could damage the fibres in the


The stain will naturally run and spread as you see here in close-up. As you put more spirit on it spreads further, even though you should try to mop up as much liquid as possible as you go. We have purposely spread the stain to show you how to treat it when this happens. .
Place a cloth underneath the area then take a kitchen folded towel or extra absorbent cloth and apply pressure directly to the stain. Keep adding spirit while the biro mark is reacting to it but mop all the spirit you can with the cloth. Any spirit left will evaporate over a short time.
Flush through with water and most of the ink should disappear. If it hasn't don't worry, simply return to the first step, apply more spirit and repeat until the stain has gone. You will probably be left with a stain of the spirit colouring (purple). If you have then dry the area as much as possible and add hydrogen peroxide directly to the area.


Leave the peroxide on for sufficient time to react with the colouring, adding more peroxide if necessary, then flush through with water, dry as much as possible and the stain should be gone.

Tea stains come in the same category as coffee, coke and fruit stains and are very common. Aim to follow the basic principles shown here and adapt the style if the fabric you're treating needs special care. Here is a tea stain we created by putting a tea bag directly onto the cloth. Tea has colouring in it so we not only have to deal with the tea but could well have to remove the colouring as well
The central dark area is surrounded by seepage, where the stain has spread. Use clear vinegar and mix 2 parts water with 1 part vinegar using a small bowl


Apply the solution with a dropper working from the middle to the edges. Continue spreading the mix all the way to the edge of the stain.
Tamp the stain by raising a soft brush above the area and letting it fall under its own weight. Do this all over the stain for around two minutes. In this case we're using the tamping technique to get as much of the mixture into the fibre as possible. Normally you would tamp to loosen a hard food type stain.


Place absorbent cloths under the stain, raise the fabric and spray water hard through the fabric over the whole area. Then place your extra absorbent cloth on the stain and hold it down to mop up the liquid. Repeat the spray and mopping procedure until there's no more improvement in the stain. Apply more stain treatment and repeat the process if the stain hasn't changed very much, but you can see some change.
Flush through with water and most of the ink should disappear. If it hasn't don't worry, simply return to the first step, apply more spirit and repeat until the stain has gone. You will probably be left with a stain of the spirit colouring (purple). If you have then dry the area as much as possible and add hydrogen peroxide directly to the area.

The stain has been reduced to a minor level and instead of treating it further with vinegar we now bleach it to get rid of colour, using hydrogen peroxide.
Apply the same method as above, using a 30% solution of peroxide and leave to dry. The results can be seen here.

With chocolate stains professionals would normally firstly take a steam gun to loosen and flush away the stain but even if you haven't got a steam gun you should be able to remove the stain completely.
This is a typical example of a chocolate stain on a child's t-shirt. In fact, children of all ages tend to drop chocolate on themselves, youngsters with sticky fingers rubbed on the garment to clean them and older ages often drop small pieces in between their legs accidentally which then melt and stick.


Once you've brushed off the particles that come off easily, we're ready to use reagents. In this case mix around 10 drops of Glycerin and Washing -up liquid with some water..
Apply the mixture, which should be thicker than water but run easily, with a medicine dropper. Make sure you put drops all over the stained area.


Tamp the stain with your soft or hard brush by raising it and letting it fall under it's own weight. As you do this all over the stained area you should see the marking slowly disappear. Add more of your mixture if the area looks dry and keep tamping until there's little of the stain left.
Place absorbent cloths underneath and spray through the fabric as hard as you can. This should visibly flush out most of the stain. Dry the area using your extra absorbent cloth. You should see very little of the stain, if it is still very noticeable add more mixture and tamp again.

The stain should mostly have disappeared as you see here. The next step is to wash the garment in the normal way.
Wine stains are quite difficult to get rid of because of the colouring in the liquid but perseverance and good technique will help you succeed. Here is a typical red wine stain but it's not on a typical fibre. The knitwear is a thick cotton knit which often proves very difficult to remove a liquid stain from because the yarn is loose and easily damaged if you work on it too strongly
Red wine stains often splatter like this one has so search for other splatters apart from the main one. Here you can see at least five. It will not be a surface stain as all the liquid will normally sink into the fibres.


Always start with the simplest possible solution. In this case it's flushing through with water from a sprayer held close to the fabric. Soak the area with absorbent cloths underneath. Don't be concerned if the stain turns blue as it has done in this case, it's a reaction that often occurs with wine stains.


Dry off the stain with an extra absorbent cloth or some kitchen towel. Now treat the stain with a solution of acetic acid (25% solution) or malt vinegar (neat) applied with a dropper. You may be able to se here that the stain is immediately turning red again.
After applying a few drops of the solution leave for two minutes and then flush through with water, like you did in the first step and dry with your absorbent cloth again. If you think you have seen an improvement but the stain is still there repeat the acid process again. Do this again until you see no improvement from this treatment. At this point there should only be colouring left so we turn to a bleaching solution to get it out.

Here we apply Hydrogen Peroxide with our dropper again so that the application is controlled. Leave the peroxide to dry and if necessary repeat the process. After you see a reaction flush through with water or wash as per the instructions on the garment.
The wine stain should be gone but you can repeat the process if necessary.

Wax is the type of stain easily removed in dry cleaning because it is dissolved by solvents. To achieve success yourself therefore requires the use of solvents but because you can't soak the whole garment then flush away and re-apply you're going to have to work at the stain to make it degenerate. If your garment is delicate you may therefore prefer to send it to the cleaners as you may cause some damage when working the stain.
Wax sticks solidly to and surrounds the fibres so it easily migrates to the inside of the cloth from the outside. Here we have used red candle wax to create a pretty nasty stain on a cotton t-shirt.


First step is to break up the excess wax on the surface. Use the reverse end of a spoon to dig at the wax and break it up without digging at the fibre itself. The aim is just to break up the wax so that the solvent has less work to do but if you're concerned about damaging the garment then move to stage 2 and you'll simply have to add more solvent and take a little more time to achieve the same result.


You should be able to see, from the picture on the above, that there is a residue of wax scraped from the area, which is all we hoped to achieve. Now we're ready to add the white spirit, which you see being applied with a dropper in the picture on the right.
Now use your spoon to work the solvent into the stain by scraping from one end of the stain to the other as you see here. Only go in one direction and add more spirit if needed.
Remember that you're actually working both sides at the same time, even though you have only worked on the face of the material. Check underneath for displaced wax on the cloth and on the protective plastic cover and pad this away using a lint free cloth.
The next action is to pad the top of the cloth, which is done by using a lint free cloth to dab the stain and wipe it away in one direction. Add more white spirit and keep repeating this until little or none of the stain is left.


Once you've done this for a while the stain should clear and no wax residue should be left. Remember the underneath of the cloth though, you could be pushing down on removed wax so lift the material and wipe underneath regularly.
Leave the white Spirit to evaporate and there should be no residue left. Alternatively wash the garment in the normal way.
If the wax has left a colour residue work at it with methylated spirit and pad away the colour. Flush through with water and use Hydrogen peroxide to bleach any remaining colour.

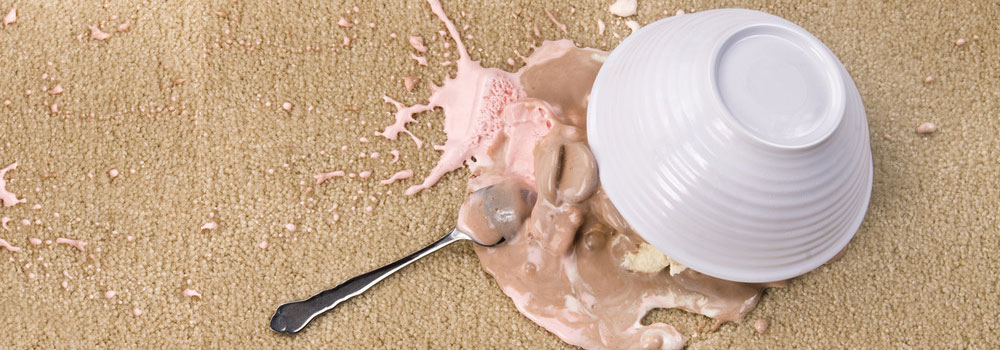
Mayonnaise has oily fat and eggs in it so treatment for this type of stain forms the basis for many others. Traditionally Amyl acetate or methylated spirit act well on removing oily (fatty) residue but often the treatment below removes the stain completely, leaving solvents to just cope with any residue.
This stain is fresh and has only had the surface mopped up with a kitchen towel. It's very important at this stage not to rub the stain hard with the cloth as this will only spread the stain and is likely to push it into the fibres of the garment.


Instead, surround it with a cloth and pinch inwards from the edges. This won't damage the fibre as it's difficult to add too much pressure using this method.
The stain should now have been reduced to a greasy stain, as shown here.


Use Glycerin (available from any pharmacy) mixed with washing up liquid and water. Take any small bowl, add a small amount of washing up liquid and the same amount of glycerin (which is quite a thick liquid). Add 5 times that amount of water and make sure the reagents mix evenly.
Apply the mixture with a dropper thoroughly covering the stain and then tamp the liquid into the area by raising a soft brush and letting it fall under it's own weight, for around 2 minutes.
Spray water through the stain from close to the fabric. Make sure you have an absorbent cloth underneath and spray as strongly as you can "through" the material.


When you believe all the reagent has been flushed away dry the area with your extra absorbent cloth. If you then see a residue of the stain flush again with water and then dry
You should have completely removed the stain but if any residue remains get some amyl acetate on a cloth (nail varnish remover will do) and add this to the area, letting it evaporate away.
Do not use amyl acetate on acetate fabrics (which is the mixture we have here). Instead use methylated spirit.

Office:
Pool House
34 Ivinghoe Road
WD23 4SW
|
|
|||